

Red Dead Redemption 2 Explorer 5
I started writing about "Red Dead Redemption 2" when I noticed how lilliputian info was available online.
The ecstasy of what's in the box.
Greed Is Good, merely the Hunt Is Better
If y'all similar to do a fiddling detective work and/or make lots of coin, these are the ones for y'all! These are essentially Red Dead Redemption'due south Treasure Hunter Challenges, except they can be completed in whatever social club. To view Treasure Maps, agree Correct on the D-pad, cycle to Documents, and select "Treasure Maps." There are three Treasure Hunts (well four if you lot bought the Special or Deluxe Edition of the game, I bought Standard so . . .), two are available from the first of Chapter two, the 3rd is through a random come across. I'll list them in "gild of appearance."
This article will also cover a couple of other Treasure Hunts that are not associated with the Explorer Challenges. If in that location's a map, it's going to be in this article. As well, similar the other challenges in this game, it's best to pace yourself throughout the story. I'll list when the best time to do the perspective prospecting.
Explorer Challenge #1: Discover a Treasure Map
When You Can Do It: At the starting time of Affiliate ii
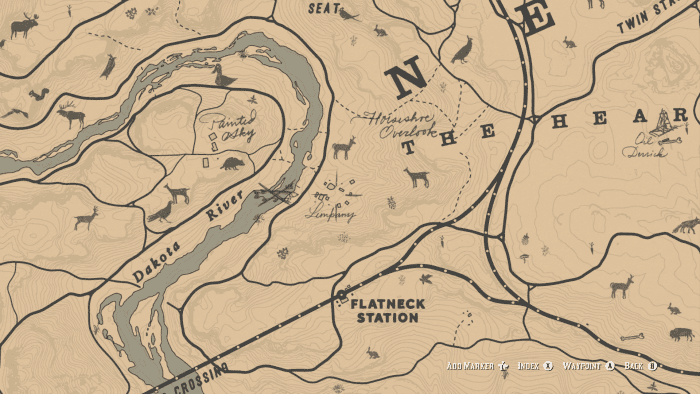
The closest, and earliest, Treasure Map is the Jack Hall Gang Map, which is located virtually Flatneck Station, southwest of Valentine. In that location will be a man named Maximo who y'all tin can buy the map from for $10 (or $5 if y'all decline his FIRST offer).
The other you tin become during the "The Noblest Men, and Woman" Stranger Quest, which yous can begin in the smaller Saloon in Valentine. Go into your Satchel and select the Flaco Hernandez Photo. Press A/X to flip it over, this will mark his location on the map (this also works for the other three Gunslingers, wish I knew THAT earlier . . .) Ride up to the West Grizzlies, accept care of the gang, and loot his cabin to notice the starting time office of The Poisonous Trail Map. (Notation: You can go up hither without doing the Stranger Quest, but it will save you a ride.) Every bit you get to set on Flaco'southward men sneaking up to the camp tin get you a Knife kill, or two, for Weapon Skilful Challenge #i.
Thirdly, the High Stakes Treasure can exist found, through a random run across, as early equally later the Affiliate ii mission "The Get-go Shall Be Last." For some reason, a lot of YouTubers and other online sources say "not until after Chapter 3," merely I can indubitably assure you that this is bull s***. Y'all accept a great chance of running into him, after "The Get-go Shall Be Last" as you're riding back to Dutch'south Campsite. You can too trigger the encounter while heading to Strawberry, in Chapter 2, to do the mission "Blessed Are The Meek?" Anyhow, once y'all find him, use your Lasso to steal the High Stakes Treasure map from his person. You won't lose an Honor signal unless you kill him, and once/if you cutting him free, there won't be a confrontation.
Loftier Stakes Map Possible Spawn Point

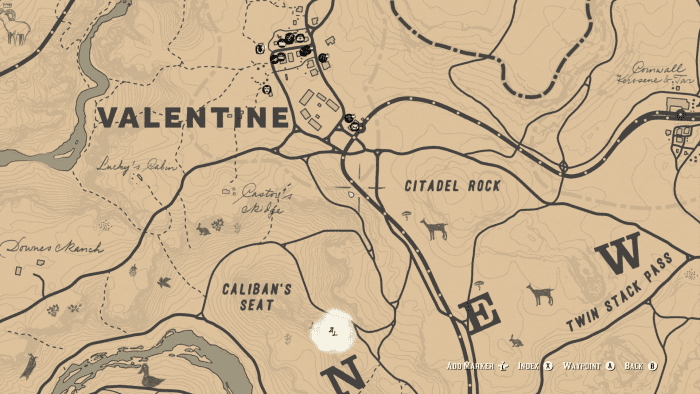
Explorer Challenge #2: Notice a Treasure (Jack Hall Gang Map 1)
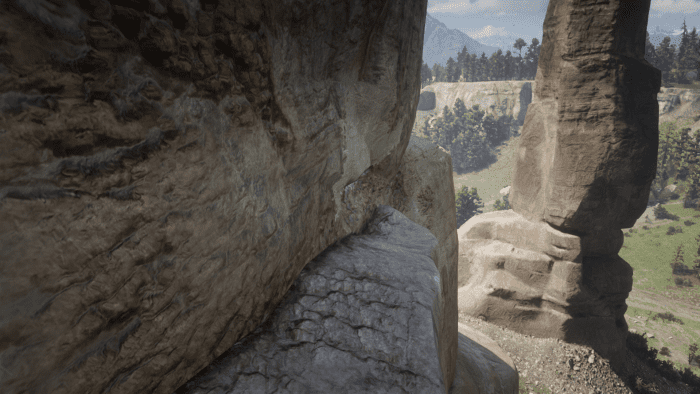
One time you reach the location in the 2nd screenshot, dismount and run up the southwest side of the mountain. (Note: yous COULD ride up this little trail only you run the take chances of harming your horse. It's best to just proceed foot.) Y'all'll encounter a pathway that will take you to the top of Caliban's Seat. As you run along the top, you'll see a slope to the correct, follow that downwardly and go left. Follow the ledge and exist prepared to do a running jump to pass the gap (or else you'll have to outset this over again if you don't die that is . . .) Climb and so drop down past the the stone wall ahead of you. Become to the stop of the ledge and printing+agree X/Square collect the next Treasure Map (meet below screenshot).
To get back downward, climb dorsum over the stone wall, then carefully drop downward to the ledge (that gap to ran and jumped earlier) to somewhat carefully get back down to ground level.
Explorer Challenge #iii: Find a Treasure (Jack Hall Gang Map ii)
The adjacent treasure map is up at Cotorra Springs (which by the way is besides the location of the Legendary Wolf). There are three geysers here, merely where you want to be is at the w cease of these geysers. There will be a few rock piles at the "home base" part of the area (or would that be "dwelling wicket" for you lot folks across the swimming?). The treasure is in one of these piles, press+concur X/Square to search for it.
The treasure map is in THIS pile of rocks. Where is that exactly? Practiced luck buddy!
Scroll to Continue
Read More From Levelskip
Explorer Challenge #4: Find a Treasure (Jack Hall Gang Map three)
You lot visited O'Creagh's Run during the Chapter ii mission "Get out Pursued By A Hobbling Ego", so information technology should be on your map. From the peninsula, on the due west side of the lake, use your equus caballus to swim out to the small long island. There will be a piffling platform of state you can climb up onto. Press+hold X/Square (after dismounting or you lot'll hear a splash) to grab the treasure under a flat rock.

Video Walkthrough
Explorer Challenge #5: Find a Treasure (Poisonous Trail Map i)
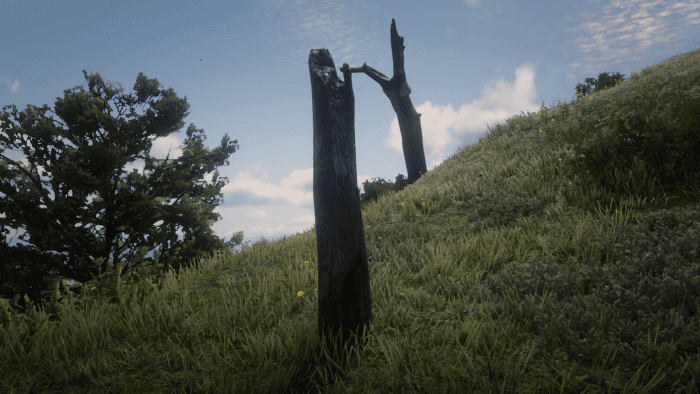
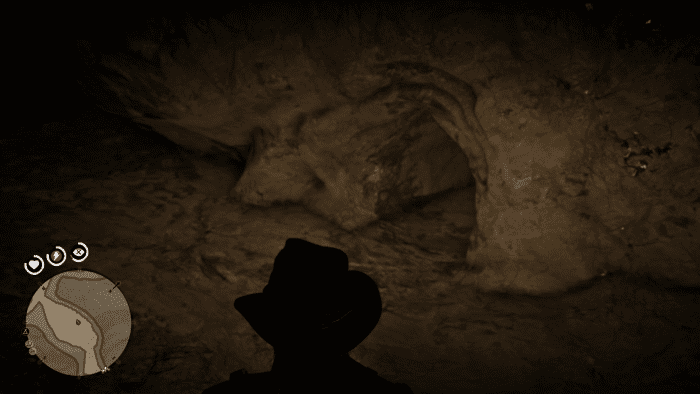
Merely north of Rhodes is an interestingly shaped rock confront (kind of like a mini Mount Rushmore) where there'due south a expressionless tree on the right side (coincidentally like the moving picture in the map). Ride up and around the correct side of Face Rock, where you lot will find another dead tree with the side by side piece of the map (plus a minor treasure) within.
Explorer Challenge #6: Find a Treasure (Poisonous Trail Map two)
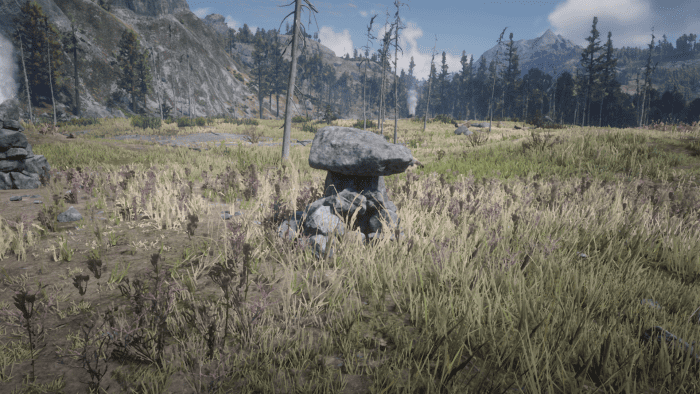
Take a train to Annesberg then ride south to Van Horn Trading Visitor (shame you just can't have a stagecoach directly in that location without discovering it). Ride due west, and a lilliputian scrap due south into the hills. Y'all'll come across this strange land formation in the above 2nd screenshot. The Snake Mound has the next piece of the treasure in the "sculpture'south" center.

Explorer Claiming #seven: Find a Treasure (Poisonous Trail Map three)
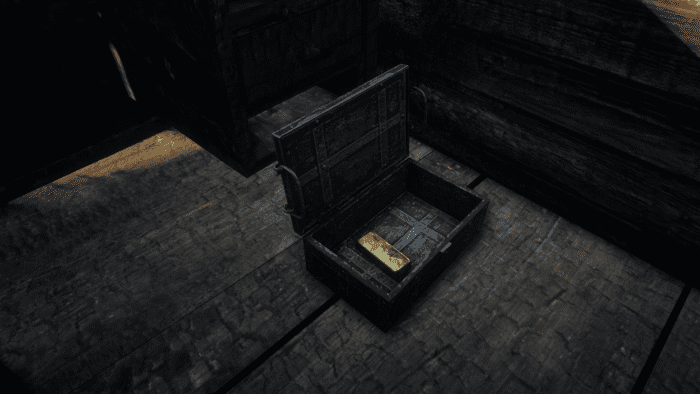
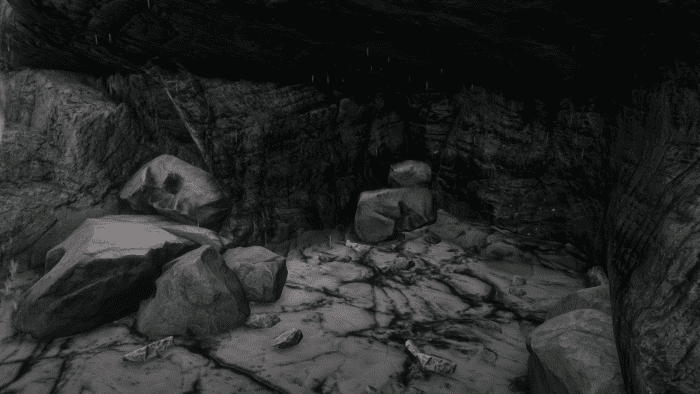
Run through the waterfall and follow the tunnel until y'all discover a dropoff on the right. Drib downwardly and crouch to go through a small tunnel here (see outset screenshot beneath, I'll give yous this one). There will be a modest camp on the right with a lockbox merely obviously THIS isn't the treasure you seek.
FROM THAT Camp, brand a right and follow the tunnel. You lot will come up to a big open room with a drop. Follow the ledge to the left and bound downward to the platform beneath (if you go to the right you'll slide down to your expiry, thank you a lot physics engine . . .) Walk up the slope to the left (come across 2nd screenshot below) and you'll slide into the some water. The treasure is on the left behind some rocks.
To get back out of the cave, climb back upwardly the slope and use the ledge on the right (also in the second screenshot) to get back upward to where you were. From here follow the cave back the style you lot came (don't bother going to the left that'south role of a Stranger Quest later on in the game). This cavern on the left is also a keen place to do Survivalist Claiming #7 later.
Video Walkthrough
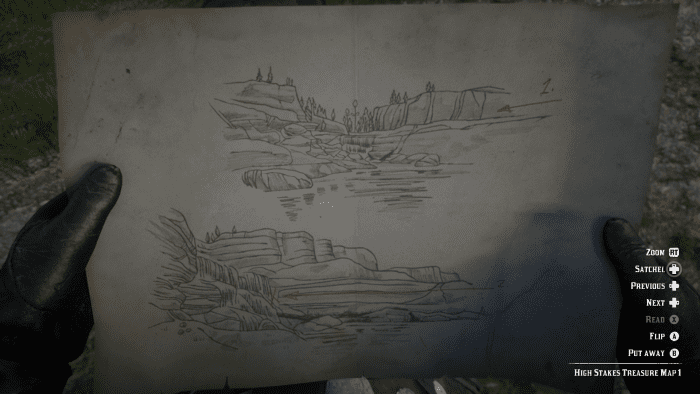
Explorer Challenge #8: Notice a Treasure (High Stakes Treasure Map one)
Cross the Dakota River and run along the right side (facing the waterfall). Earlier yous keep the fallen tree, and walk through the waterfall, you might want to switch to commencement person. I typically play in third with the camera all the way out so the results might be different for you. Despite how much water is covering your screen, turn left and press X/Square to climb. Caput forth this ledge and you'll see an alcove on the correct where yous'll find the next map.
Explorer Challenge #9: Find a Treasure (High Stakes Treasure Map 2)
Ride up along the dotted trail, by the cabin and grave site of that figure skater dude, and dismount near the base of the ridge. You can climb upward a small trail that will help yous get to the height of the ridge. The map tells you lot the next map is on the actual island, but it'due south really inside the log that acts every bit a bridge to the island. Is at that place something of annotation on the island? I can't remember. Ironically, when I was looking for the terminal piece of the Jack Hall Gang Treasure, I idea it was hither. At that place was a chip of trial-and-fault while writing this commodity, hope you folks appreciate that.

Explorer Challenge #10: Find a Treasure (High Stakes Treasure Map three)
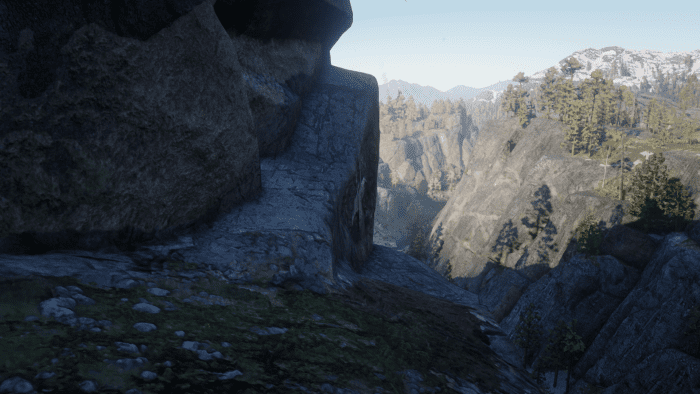
Follow the directions as they are written on the map, until you become to the pathway (you're gonna need my assistance from here manifestly . . .) Make a left and IGNORE that ledge below on the right, I've made that mistake a couple times. You'll come up to a fork, a slope going up on the left, and ane going down to the right. The slope on the right has a Rock Carving, merely the path to the treasure is on the left slope heading upward (see get-go screenshot below). Crouch walk along the ledge carefully since sometimes Arthur will slide unexpectedly off the cliff face (because physics engine, that's why).
Proceed following the ledge until you come to the spot in the second screenshot below. Don't make my mistake and try to sprint+bound that gap on the lower correct, that's actually your path support to where you lot started. Instead continue following the ledge to the left, crouching under the low cliff, and the treasure volition be tucked away in a scissure. Hold Ten/Square to Search and y'all'll be three Gold Bars richer.
You have now completed all ten Explorer Challenges.


Video Walkthrough
Landmarks of Riches
The Landmark of Riches Treasure Hunt is the first of two previously PC exclusive Treasure Maps that were added to consoles with the i.xv Update. You tin can showtime this Treasure Hunt as early on as the beginning of Affiliate 2. I personally recommend waiting until later on the Affiliate 2 mission "Blessed Are The Meek?" for two reasons. Firstly, it will "unlock" this section of the map, and secondly, it volition help the pacing of the game's story if you lot're multi-tasking with the other Challenges. (Note: This map will count toward the Explorer Challenges.)
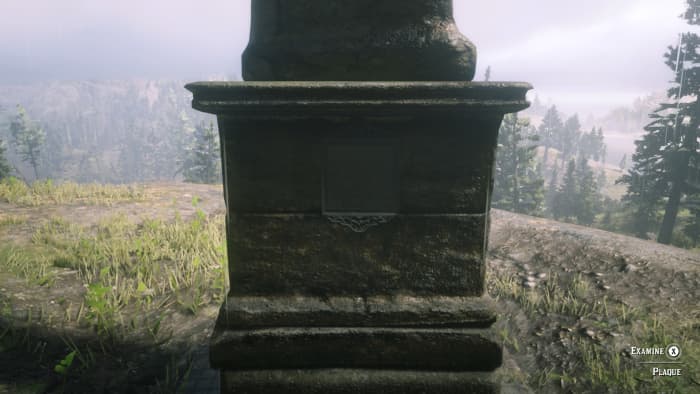
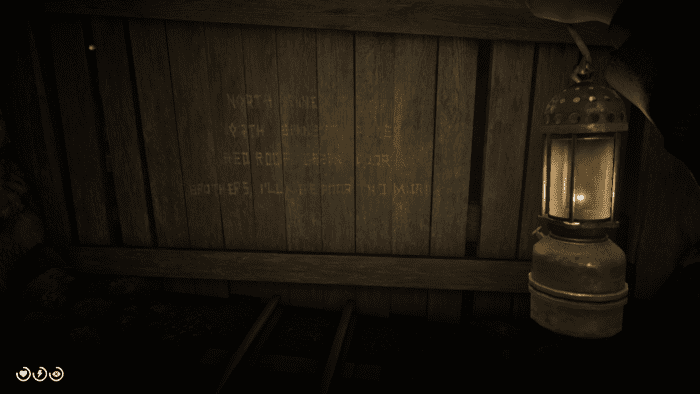
Facing east there will a plaque with the map within.
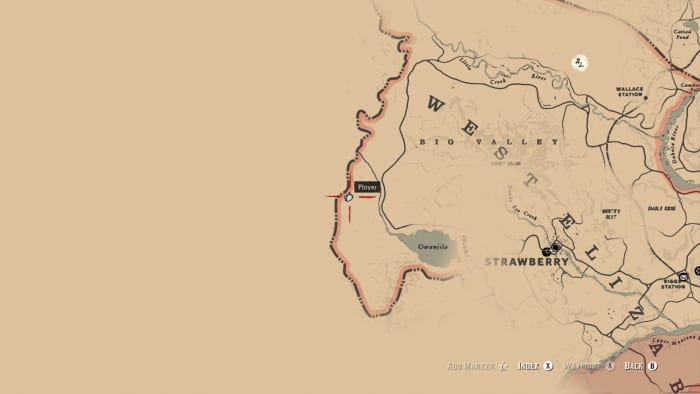
The location west of Owanjila where you can find the Obelisk.
Ride west from Strawberry toward lake Owanjila. Rather than following the route, ride west across the water and follow the ridge (the edge of the game'southward map) north. You'll run into a grey tower-like structure at the superlative of a hill. In this Obliesk is the first treasure map.
If you're interested in finding unique horses, you lot can detect the Crimson Chestnut Arabian around this area.
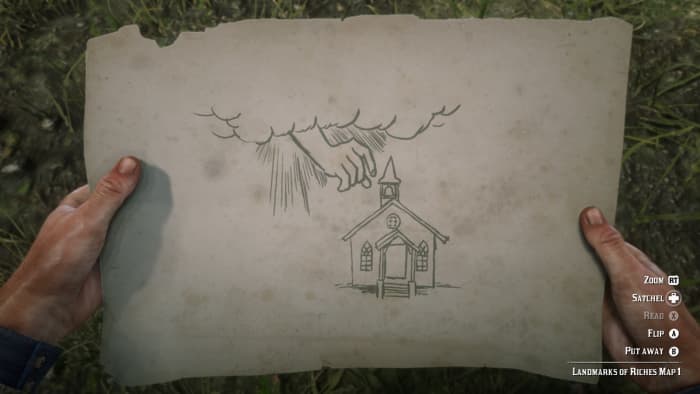
See? Fifty-fifty God's pointing at the bell belfry.
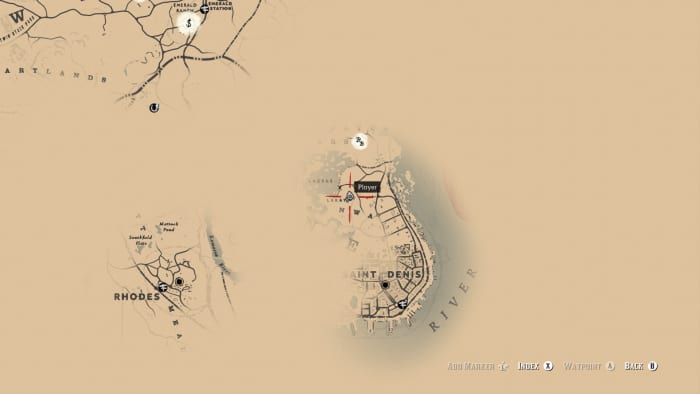
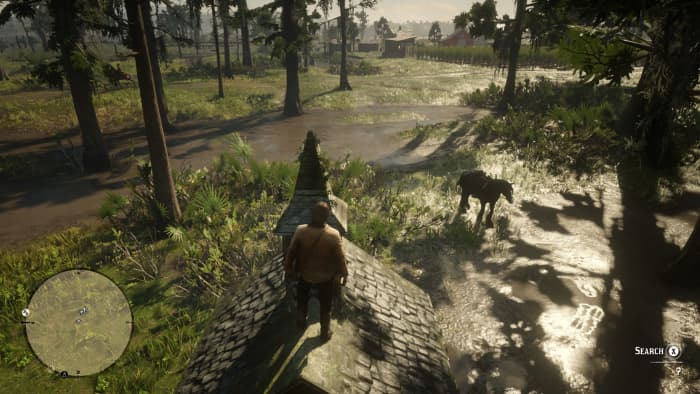
The location of the "Tiny Church" in Affiliate two.
Landmarks of Riches Map 1
Take a train to Saint Denis Lemoyne and ride north out of boondocks (the dotted line that show'south the metropolis limit) ride west toward Lagras, cutting through the swamp. Yous will come across a Indicate of Interest called "Tiny Church." Climb on the roof, and to the mini bong tower, to notice the second Landmarks of Riches map. (Annotation: It's a fiddling tricky to go the "Search" prompt to appear due to the slanted roof.)
Landmarks of Riches Map 2
This adjacent i took a little flake for me to effigy out before I wrote this part of the article. Despite the illustration, we won't be looking for a giant turtle, but the next thing that comes close is the "Mysterious Colina Home." To go here, early in the game, take a train to Wallace station and follow the train tracks to Bacchus Station. Make a left at the road, caput north, and brand a right at the intersection. You'll come across the "Mysterious Hill Domicile" on the right. On the south finish of this edifice is a cleaved window up above. Use the crates below to help yous get upwards at that place to notice the Landmarks of Riches Map #iv.
Likewise, while you're hither, yous can grab a free Poisonous Arrow Pamphlet if you're interested in doing the Survivalist Challenges.

Landmarks of Riches Map 3
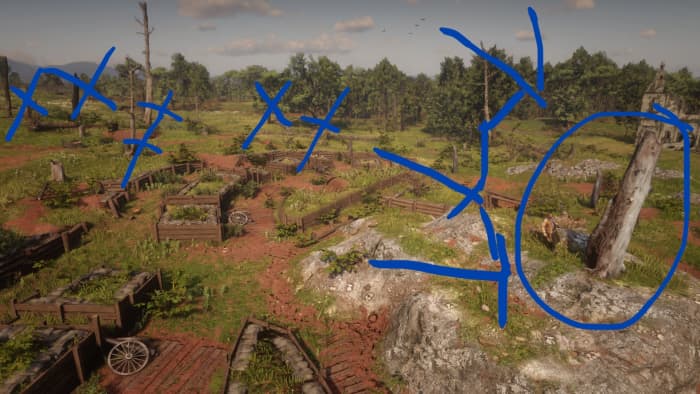
The only other clue harder to figure out than a giant damn turtle is a lone cannon, with a hole in a tree, in a field of cannons, with holes in trees. Regardless, I know the location of the exact 1, so you lot don't have to stress over information technology. Take a train to Rhodes (or stagecoach if you've already gone after Billy Midnight during "The Noblest Men and Woman" Stranger Quest), then ride south toward Bolder Gate. In this Civil War battlefield volition exist, by the trenches and to the correct of the "Abandoned Church building," some rocks with a lone tree in a higher place. The Landmarks of Riches Map #4 can be plant here.
Landmarks of Riches Map 4
Accept a stagecoach back to Strawberry and follow the road n out of town, make a left at the first dotted path and follow it to the pinnacle of Mount Shann. At the top, where all of the trails converge, you lot'll find a sundial. Under the rock with the orange line, you'll detect six Aureate Bars.
On a side note, if y'all're in the midst of doing Weapon Proficient Claiming #iii, you lot tin can detect several birds of prey on the road down from the Sundial.
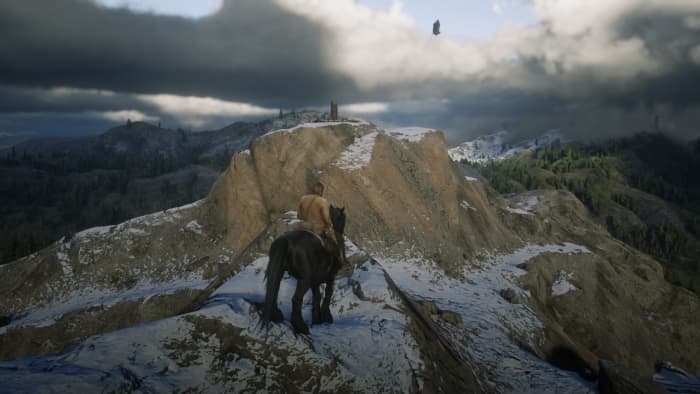
The sundial will be popping upwardly like this from the path.
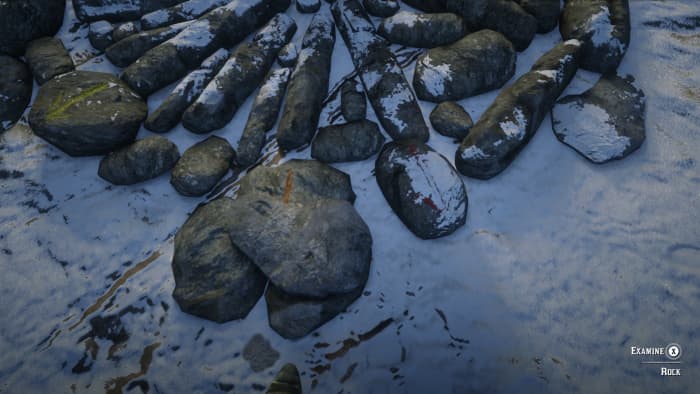
The treasure will exist under the rock, on the left, marked with the orangish line. No that wasn't me this time, it never looks that good.
The Elemental Trail
The Elemental Trail Treasure Hunt is the second of two previously PC exclusive Treasure Maps that were added to consoles with the 1.15 Update. Information technology will non exist available until Epilogue Part ane, specifically after the mission "Motherhood" which gives John admission to shops and the total weapon armory. You know freedom's a useful affair in a Costless ROAM game? What makes this Treasure Hunt then bang-up is it actually makes going to New Austin worth information technology. God knows it was an anomaly before Red Expressionless Online came out . . .
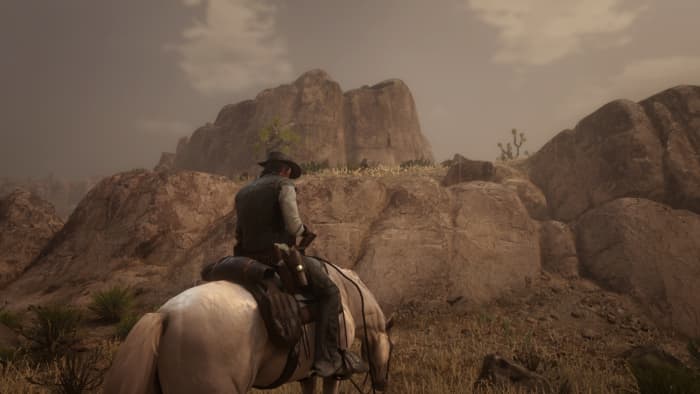
Remember when there was the corpse of that Jesuit Missionary at the Sea of Coronado? And that was virtually all there was to discover in that area? Well now there volition be a corpse hanging from a platform on the side of a cliff! More chiefly that corpse will have the first map of The Elemental Trail on information technology's person. You tin can't miss information technology, just shoot the rope and loot the corpse. To become out to the Sea of Coronado ride due west from Blackwater. Ride for a while . . . Hopefully you're familiar with the original Red Expressionless Redemption map knowing simply how far west you lot demand to become.
The Elemental Trail Map one
Ride along the San Luis River, heading east, until you lot come to a dilapidated structure on the shore. Search the chimney of this structure to find the 2nd Elemental Trail map. You will also find a Horse Meal which makes me wonder how long it's been there, and more importantly, how good for you that would be to feed your steed . . .
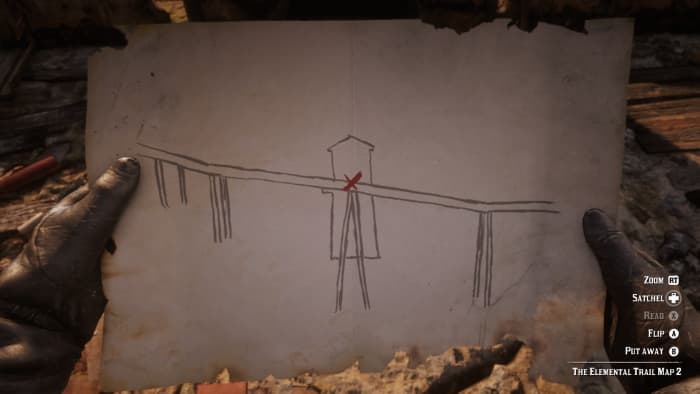
Could this exist in the center of the chute!?

You lot tin find the side by side map at this point . . . Benedict Signal that is.
The Elemental Trail Map 2
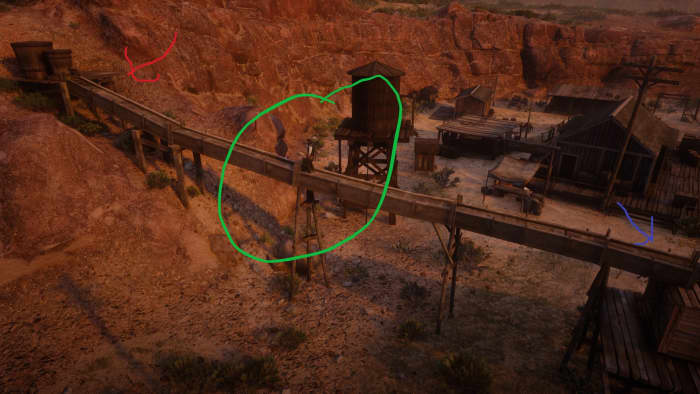
Ok now let's ride Back west this time to Benedict Betoken. What you're going to want to do is caput up onto the cliff at the east end of the area. Advisedly walk down the water chute, and along the centre, you'll get a Search prompt. Inside the chute is the third Elemental Trail map and a Horse Reviver. A very horse friendly treasure hunt thus far!
The Elemental Trail Map 3
Ride northward to Tumbleweed and have a stagecoach to Armadillo (unless yous want to ride eastward again, Lord knows this treasure hunt is similar a ping pong game.) Once you lot become to Armadillo caput east toward Coot's Chapel, it'south not far abroad. Head to the back of the church and to the grave (look up details later). Here yous'll find a Golden Bar and the Crow'southward Nib Trinket, which increases looted ammo by 10%. One of the new Trinkets added with update 1.15.
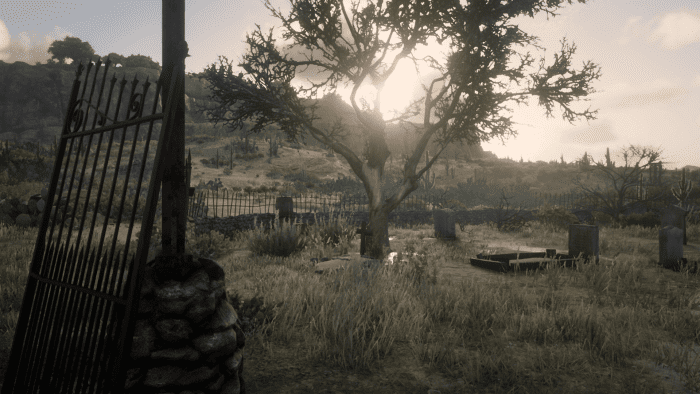
The treasure is in the grave directly under the tree.
Serial Killer Hunt
Every bit you were riding around exploring, did yous some times come up across a severed body? (No? Well check the screenshots below). Ane of the many Stranger Quests in Red Dead Redemption ii is but unlocked one time you collect three pieces of a map. Each piece is in the mouth of the body'southward severed head. Yes, that's right. At present for the sake of sparing my readers graphic content I won't mail service screenshots of the murder scenes (not to mention I recall I've overdone my screenshot quota as it is). However I will mail screenshots to the locations and let yous discover the rest for yourself!
Two Hermits, One Gold Plated Revolver
Some other unofficial Treasure Hunt (and no not linked to the Explorer Challenges, but it'southward pertinent because I say and so!). In that location are ii hermits on opposite sides of the map; both very hostile, both have smashing stuff to boodle, and both would probably be a lot happier if they found each other on Tinder or something. Of course that never really worked for me, and I almost caught something because of a daughter from Salisbury (see that's how you do "not pertinent" information).
Keep in mind you tin visit them both at any point, but unfortunately you can't chase for the treasure until during the Epilogue. (At least I recall maybe you can find it early on, I need to test that.) Non to spoil it for you lot, but the loot you get from the Hermits is actually more than valuable than some gold plated Schofield, but if you're a thirsty 14-year-old you might like the other stuff in the treasure chest too. To each their ain.

Sketched Map Treasure Hunt:
At a homestead, Reed Cottage, just Northward of Annesburg, y'all tin can notice a Sketched [Treasure] Map subconscious in the chimney on the left every bit you enter. You can easily ride by it on several occasions while riding North (post-obit a Waypoint) from Saint Denis. Information technology will accept a well out front end and a ruby-red trim. Go to the ridge (to the left of the waterfall associated with the Poisonous Trail Treasure Hunt) northwest of Elysian Pond where you'll find a tree with an "X" carved into information technology. From that tree follow the directions on the map to the alphabetic character. 20 steps North, then v steps East. Search the rock to detect a Gold Bar.
Be Like Blade and Get a Absurd Blade
Like the Otis Miller Revolver, this treasure hunt involves a unique weapon just non necessarily treasure. So for that I've probably but lost your attention, only this is a cool little Easter egg that involves some exploration.
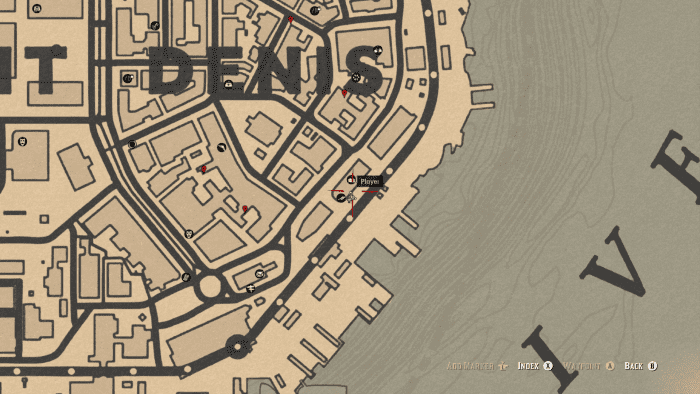
Around Saint Denis are 5 graffiti poems etched into the side of buildings. When yous find one (don't worry there are screenshots below) hold the Y/Triangle to Inspect it while standing nearby. Once y'all observe all five, get a room at the big Saloon and sleep until night. The Vampire only appears betwixt 12 and 1AM. That's 2 real-globe minutes to rush out of the room (best if you lot but jump over the balcony) and head to the location southeast of the cathedral.
If you see an "X" indicating a corpse on the mini-map and so the random come across will trigger. Become into the aisle and talk to the Vampire or you tin can just shoot him, but in that location's no fun in that. Once you do make sure to pick upwards the Ornate Dagger.
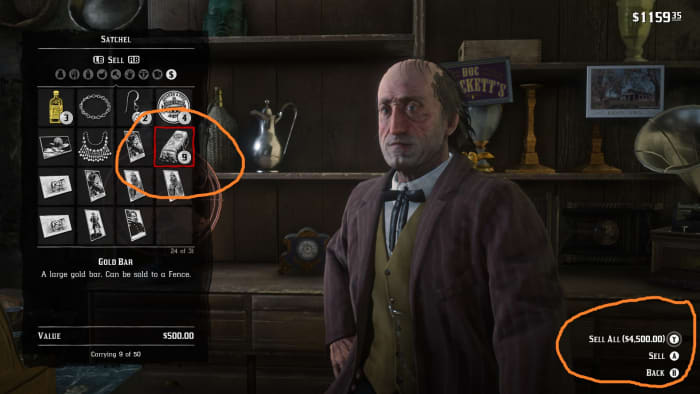
This is more money than you'll ever need in the game. Actually I wouldn't mind having $iv,500 past modern standards . . . (Annotation: Some of these Gold Bars are apart of the Treasure Hunts listed higher up.)
Where to Detect Gilt Bars
Apart from the Treasure Hunts, there are a few Gilded Bars that can exist picked upward through exploration of secret areas. I'm gonna warn you right now, I'g going to exist vague on purpose, but nonetheless point y'all in the general direction. I don't want to ruin the fun of your hunt for gold. Also because I'thousand sure information technology'south going to frustrate someone, but hey I'thousand not a successful YouTuber that ruins everything for everybody.
Endeavour to enjoy discovering this stuff for the first time, and then that you know how lost I was . . . Don't worry though I'll walk you through that Foreign Statues puzzle below.
Foreign Statues Puzzle:
Up by Window Rock in Ambarino is a stone carving (that actually doesn't count toward the overall Rock Etching Collectible) that depicts a option of Strange Statues. Finding this mural is not required to practice the puzzle but the data is helpful. You need to press a push button on the front end of the statues with prime number numbers. You can tell what number the statue is based on the corporeality of fingers it has; and then that statue that looks like is flipping you double birds? That is a "2." Select two, three, five, and the statue with 1 arm to unlock a compartment in the center sculpture containing three Aureate Bars.
If yous're one of those modern folks who gets confused unnaturally like shooting fish in a barrel I have a video below of what I just said . . .
- Ane Gold Bar: In the burnt ghost town of Limpany (see starting time screenshot below). This Gilded Bar is continued to some glitch/exploit that I practice not know and do not desire to know.
- One Gilded Bar: As apart of the higher up Sketched Map unmarked Treasure Hunt.
- Two Gold Bars: At the site of a train crash North of Cumberland Forest, North-West of Fort Wallace (see second screenshot below).
- Three Gold Confined: Afterward solving the Strange Statues puzzle.
- Half dozen Gilded Bars: As function of the to a higher place mentioned Explorer Challenges/Treasure Hunts.
- One Gilt Bar: Awarded at the finish of the Chapter two finale mission "A Strange Kindness".
- One Gold Bar: At the get-go of Chapter 4 render to Braithwaite Estate. There's a Lock Box to the left, on the other side of the wall, of Catherine Braithwaite'southward corpse.
Other "Red Dead Redemption two" Guides
- "Red Dead Redemption 2" Bandit Challenges
- "Red Expressionless Redemption 2" Gambler Challenges
- "Ruby Dead Redemption two" Herbalist Challenges
- "Red Dead Redemption 2" Horseman Challenges
- "Red Dead Redemption 2" Chief Hunter Challenges
- "Red Dead Redemption ii" Sharpshooter Challenges
- "Red Dead Redemption 2": Survivalist Challenges
- "Red Dead Redemption 2": Weapon Expert Challenges
- How to Make Aureate in "Red Dead Online"
Questions & Answers
Question: I am playing Red Dead Redemption and I found all the gold confined and all the maps yet the Explorer Challenge is stuck at Challenge eight! What tin I do?
Answer: Sometimes the game doesn't register the Loftier Stakes Treasure Chase. Go back to each of those locations and see if you take the option to redo THAT Treasure Hunt.
© 2018 Eric Seidel

Red Dead Redemption 2 Explorer 5,
Source: https://levelskip.com/action-adventure/Red-Dead-Redemption-2-Explorer-Challenges
Posted by: byrnecomee1988.blogspot.com
0 Response to "Red Dead Redemption 2 Explorer 5"
Post a Comment